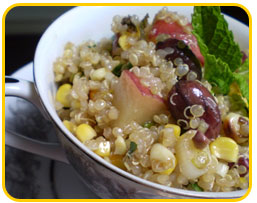
The Blooming Platter Cookbook’s Southern Sweet Tea Salad Featured in FARM’s MEATOUT MONDAY e-Newsletter

The good folks at FARM have gone and done it again…featured one of the recipes from The Blooming Platter (vegan) Cookbook in their MEATOUT MONDAY eNewsletter.

I love FARM, I love this recipe and I love serving it in my late beloved grandmother, Virginia White’s (“Nana”), tea cups that I inherited.

Thanks, FARM!

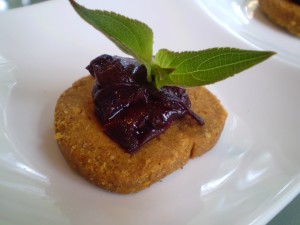
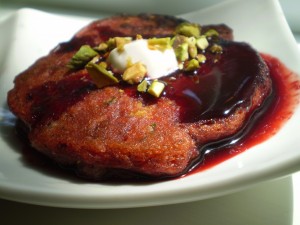
Vegan Mediterranean Beet Cakes with Beet-Pomegranate Reduction

Yield: 4 small-medium beet cakes (4 appetizer servings)

Ravishingly beautiful in color and tantalizing in taste, these beet cakes were created to us pureed beets and beet juice leftover after making my Vegan Whoopie Pies.

Plus, friends had invited us to a steak (ick) restaurant last night where I ate an heirloom tomato and arugula salad and a dab of sauteed spinach, portabellas and onions.   Needless to say, I was hungry when I woke up and starving my a decent brunch hour,  so I got this idea and went with it.  Oooh, I’m so glad I did, and I hope you are.

Beet Cakes:

1-15 ounce can beets, drained,  juice reserved (if you want to use fresh beets, trim about 2-3 of them, place them in a 1-quart saucepan covered with water, cover, bring to a simmer over medium-high, and cook until fork-tender, about 20-30 minutes; drain, reserving liquid, and peel)

1/4 cup self-rising flour

1/4 cup white whole wheat flour (or unbleached all-purpose; feel free to try whole wheat; the results will be slightly more toothsome)

1/2 teaspoon baking powder

1/4 teaspoon baking soda

1/2 teaspoon curry powder

1/2 teaspoon dried dill weed

1/4 teaspoon ground coriander

1/4 teaspoon ground cumin

1/4 teaspoon garlic powder

1/4 teaspoon onion powder

1/4 teaspoon sweet paprika

1/4 teaspoon turmeric

sea salt and freshly ground pepper to taste

1/4 cup + 2 tablespoons beet juice at room temperature

2 green onions, thinly sliced (both white and green parts)

Vegan butter and olive oil for frying (I like Earth Balance butter)

Garnishes: vegan sour cream and chopped pistachios

In the bowl of a food processor fitted with a metal blade, puree beets until smooth, scraping down sides of bowl as necessary.  Remove 1/4 cup puree; store leftovers in an airtight container in the refrigerator.

Preheat the oven to warm. Make pancakes:  in a medium mixing bowl, combine all dry ingredients, including spices.  Make a well in the center of the dry ingredients and pour in beet juice. Whisk together until well combined.  Stir in the slice green onion.  In a large cast iron skillet or griddle over medium-high heat, melt 1 tablespoon of the vegan butter, olive oil or a combination. Using 1/4 of the batter (about 3-4 tablespoons), make beet cakes, four at a time. Cook two-three minutes on the first side until you get a nice rise, a few bubbles appear, and the edges appear set. Gently flip and cook another couple of minutes on the reverse. Add butter and/or oil to keep the skillet greased as needed. If beet cakes are cooking too quickly, lower the heat to medium, especially for the second side. When cooked through, remove cakes to plates or a platter, keep warm, and make Beet-Pomegranate Reduction (below).  Serve each beet cake topped with a spoonful of the sauce, a dab of vegan sour cream and a sprinkle of chopped pistachios.  Sprigs of cilantro would also be nice.

Beet-Pomegranate Reduction

Remaining beet juice (about 1/3-1/2 cup)

pinch garlic powder

pinch onion powder

1 tablespoon pomegranate molasses (available at Mediterranean/Middle Eastern markets; you may use light molasses, maple syrup, balsamic reduction, etc., which would still be tasty, but would definitely have a different flavor)

Place beet juice, and both garlic and onion powder in a 1-quart saucepan.  Boil vigorously for several minutes or until reduced by half.  Stir in pomegranate molasses and heat through.  Serve immediately drizzled over beet cakes.

You’ll find other delicious pancakes elsewhere on this blog and in The Blooming Platter Cookbook: A Harvest of Seasonal Vegan Recipes.

Vegan Whoopie Pies with a Secret Ingredient

Yield: 12 Whoopie Pies

I’m a southern gal and we didn’t grow up knowing what Whoopie Pies were.  But now I know I missed out!  These New England comfort snacks are all the rage and it’s easy to see why: what’s not to like about a fluffy white filling sandwiched between two cake layers that look more like cookies?

So, seduced into trying my hand by the appealing-looking version that Starbucks sells, I set about yesterday to create vegan Red Velvet Whoppie Pies but without all of that red dye.  My plan was to use a can of beets that has been in our pantry for I don’t know how long.  Why this seasonal cook had canned beets in her possession can only be explained by something like hurricane preparedness!

It turns out that the color is just not intense enough to turn the batter red.  The puree and juice look ruby red, but they become much more subdued in the batter, which is okay, as it just makes these chocolately Whoopie Pies a warmer brown color.   I think beet powder would do the trick, so I plan to experiment.

The trouble with canned beets as a food item is that they are virtually devoid of nutrition except a tiny bit of protein.  I suppose they contain micro-nutrients, but those aren’t listed on the label.  However, they do contain carbohydrate, a wonderful texture, sweet flavor, and the previously mentioned bit of protein, so they seemed perfect for adding body to my Whoppie Pies, red color or not…and they were!   Hope you agree!

Pies:

1 tablespoon apple cider vinegar

1 cup unsweetened or plain soymilk

1-15 ounce can beets, drained, 2 tablespoons of  juice reserved (if you want to use fresh beets, trim about 2-3 of them, place them in a 1-quart saucepan covered with water, cover, bring to a simmer over medium-high, and cook until fork-tender, about 20-30 minutes; drain, reserving 2 tablespoons of liquid, and peel)

1 1/2 cups canola oil

1 1/2 cups sugar

1/4 cup cocoa powder

1 teaspoon baking powder

1 1/2 teaspoons baking soda

2 teaspoons vanilla extract

3 cups white whole wheat flour (or unbleached all purpose)

Preheat oven to 350 degrees.  Line 2 baking sheets with Silpat or parchment paper.  Make soy “buttermilk” by whisking apple cider vinegar into soymilk and setting it aside to curdle.  Whisk again before using.  In the bowl of a food processor fitted with a metal blade, puree beets until smooth, scraping down sides of bowl as necessary.  Remove 1/2 cup puree; if there are any leftovers, store in an airtight container in the refrigerator.

Place puree, 2 tablespoons of juice, oil, sugar, cocoa powder, baking powder, baking soda, and vanilla into the bowl of an electric mixer.  Beat about 1-2 minutes or until completely combined and sugar starts to dissolve.  Then add flour, in three parts, alternating with “buttermilk,” beating only enough after each addition to incorporate ingredients.

Using heaping tablespoons (I like to use the traditional fairly shallow measuring spoon, as the shape is perfect) make 24 “patty” shapes, 12 per baking sheet.  Avoid crowding them and bake in two batches if necessary, though they won’t spread much.  Bake about 12 minutes until the “cookies” are firm, but not crisp.  They should be about the consistency of a cupcake top.  Let cool for 10 minutes on baking sheets and then remove to a wire rack to cool completely, covered with a dish towel.

Filling:

6 ounces vegan cream cheese

4 1/2 tablespoons vegan butter  (I like Earth Balance)

1 teaspoon vanilla

1/2 teaspoon almond extract

4 1/2 cups powdered sugar

In the bowl of an electric mixer, beat cream cheese and butter at medium to medium-high speed, until smooth and fluffy.  Beat in extracts followed by powdered sugar, about 1 cup at a time, starting the speed on low and gradually increasing.  Keep beating until the mixture is very smooth and somewhat fluffy.

Turn half of pies upside down and, using a tablespoon, dollop frosting evenly among them.  You can coax the frosting to the edge with a spoon or spatula or, do as I do, and just gently press the top half of the pie down to squeeze the frosting to the edges. I like to wrap them individually in plastic wrap, store them in the refrigerator, but let them come to room temperature before serving.

Note 1: If you want to dress them up a bit, as in the photo, just melt some vegan chocolate chips in the microwave (about 1 minute at 20 second intervals) and, using a small spoon, just drizzle the melted chocolate over the tops and allow to harden before wrapping/storing.

Note 2:  These stack nicely in a wine sack for gift-giving.

Vegan Plum Delicious Double Chocolate Walnut Cookies

Yield: 3 dozen cookies

A small number of almost over-ripe plums gave rise to this unusual and unusually good cookie.  The plums provide mostly moisture in addition to subtle flavor and color, not to mention added nutrition–as do the walnuts– to an otherwise decadent treat.

To create this recipe, I started with my go-to brownie batter, omitting the water/coffee and adding plum puree plus a tiny bit of baking soda.  The results are plum delicious!    Note:  I only had a few plums, so I made one-fourth of this recipe.  It quarters or halves very nicely.

2 1/2 cups white whole wheat flour (or unbleached white flour)

2 cups natural sugar

1 cup unsweetened Dutch processed cocoa powder

1 teaspoon baking powder

1/2 teaspoon baking soda

1 teaspoon sea salt

1 1/4 cups canola oil (this sounds like a lot, but you’ll need it)

2 cups very ripe pitted plums, pureed in food processor until fairly smooth

1 teaspoon vanilla extract

2 cups vegan chocolate chips (I like Trader Joe’s–what  a great value!)

2 cups chopped walnuts plus 36 extra halves or  large pieces for garnish, one per cookie, if desired

Preheat oven to 35o degrees.  Line a baking sheet with Silpat or parchment paper and set aside.  (Line two if you have them, or bake the cookies in two batches.)  In a large mixing bowl, stir together all ingredients, except chocolate chips and nuts just until well combined.  The dough should be just slightly stiffer than brownie batter.  Stir in chips and nuts.  Spoon tablespoon-size mounds of dough onto prepared sheet, about 2 inches apart.  (I use a very traditionally-shaped shallow tablespoon measure, as I like the ration of height to width.)  Bake 12 minutes.  Check after 8 and after 10.  They should be set, but shiny in some spots, as they will continue to cook after they are removed from the oven.  Allow the cookies to cool slightly until they are easy to handle and then use a metal spatula to remove them to a wire rack to cool completely.  Store in an airtight container.

High Praise on Amazon for The Blooming Platter Cookbook

On Amazon recently, I stumbled across a review for The Blooming Platter Cookbook written by one Terri Lynn Merritts.

It read like something my mother would have written(!) only Terri and I don’t know each other…or we didn’t until I sought her out on FB after reading her high praise.

Her words are music to my ears:

“I am seriously impressed with the recipes in Betsy DiJulio’s new book THE BLOOMING PLATTER COOKBOOK”…These are some of the most elegant and impressive recipes I have ever seen collected between two covers yet each one is easy doable by any cook. Betsy DiJulio has done an incredible job of sharing recipes you cannot find in any other cookbook. This is a truly unique, must-have cookbook.”

Thank you, Terri.

VegNewsletter Features a Recipe from The Blooming Platter Cookbook

Hi everyone~

I just signed up for VegNews Magazine’s free online VegNewsletter and wanted to encourage you to do the same!

While you’re at it, you might want to subscribe to the actual magazine; it’s a great deal at only $20 per year with discounts for 2 and 3 year subscriptions.

The range of content is amazing.  Vegan food and wine is just the start.  There is travel and  fashion and, well, news on a host of topics as the title suggests.

Speaking of food and wine, the current issue features a recipe from The Blooming Platter Cookbook!  It’s my Mango Coconut Sorbet, a summertime favorite.

Thanks to all the folks at VegNews for including The Blooming Platter in VegNewsletter; it’s such an honor!  I can’t wait to meet all of you on my trip to San Francisco next week!

Vegan Beet Muhummara from The Blooming Platter Cookbook was on My July 4 Menu

For us, July 4 has never been about BBQs or really even hanging out with friends.  In fact, I can’t remember what I’ve done on most of these holidays.  I do remember one July 4, just after graduate school when I still lived in Nashville, going berry picking with my roommate and good friend to this day, Mary Gattis.  Other than that, I’m blank.

Today was no different.  I worked until about 2:3o and then, while my husband smoked a cigar (I know; I can’t do anything with him) and read on the deck, I spent about 4 methodical hours in our garden.  We live on an acre and a half of wooded marsh-front property from which we removed only enough trees to build our house.

Because we live on the marsh, I’m sensitive to run-off issues related to lawns, so no lawn!  I also didn’t want a lawn because they are such resource hogs.  I opted instead for rock gardens with planting beds in our narrow back and side yard s(our property is long and narrow with a 200-foot driveway and our house situated sideways), and a dry creek bed, raised berms, and other plantings with a quasi-Asian feel in the front yard and along the street.

Soon I’ll post some photos of the improvements I made today using plants I’d purchased yesterday and according to a plan that has been a long time in coming.  Also partially responsible for the new look are 25 (!) canna lilies I found on a dog walk–rhizomes still attached–stacked next to someone’s curb waiting to be discarded!  The basic structure of the landscape was created with the help of a landscape designer about three years ago, but there were some things I wanted to change, yet a solution had been eluding me.

Anyway, that’s a long way of saying that I was glad  that I had made fresh Beet Muhummara yesterday and created (and photographed) a beautiful plate of the beet spread and accompaniments earlier today so that it was ready as soon as I had showered.  I served the spread with cucumber slices, spinach leaves, and some fresh fried sweet potato slices that I sprinkled with a mixture of 1 tablespoon sea salt, 1/4 teaspoon ground cumin, and 1/4 teaspoon smoked paprika.  Oh, and some champagne.  🙂  Forgetting that walnuts were in the spread, I sprinkled a few pistachios on top.  That’s okay, though, the green nut looked really pretty against the bright fuscia spread.  And I think I’ll make some brownie bites with those leftover walnuts.

The recipe is in the Starters section of The Blooming Platter Cookbook: A Harvest of Seasonal Vegan Recipes. Honestly, this recipe–my take on a traditonal Turkish roasted red pepper spread–is so good that it’s reason alone to purchase the book!  But there are some 150+ other excellent reasons as well.

Vegan Cookbook Author Scored in Her Neighborhood Thrift Store

Veganism and sustainability go hand-in-hand.  What easier way to embrace sustainability, in this case, preventing discards from entering the waste stream, than through thrift store shopping?

As a frugal recycler–and who isn’t even a little frugal in this economy?–I love good thrift stores (and consignment stores) almost more than antique stores.  Yes, I am my mother’s daughter when it comes to antique stores, but thrift stores–as long as they don’t have “that” odor (you know the one)–are ridiculous in terms of prices.

I rarely purchase clothes in thrift stores–though I hardly own a stitch of clothing or pair of shoes that didn’t come from a consignment store–but when I drop off donations, or when I’m looking for something like board games or still life objects for my students, I always make a spin through the housewares.

This week  I scored big with this signed ceramic vase that seems made for our home.   About 8-inches tall and a sort of flattened shape, its clay body is terracotta and its surface decoration small slightly raised and slightly irregular cobalt blue squares  that create a checkerboard pattern.  I put it in our den which is painted a terracotta color, as you see in the photo, with a few cobalt blue and orange accents.

The colors were pulled out of a “crazy quilt” that my mother made me when I graduated with my M.A. , and she had never made a quilt before.  She made it from  fabrics from which either she or I had sewn clothing as I was growing up (another take on recycling).  I was so touched.  It is one of my top 3 cherished objects, partially because she made it, but also because it’s gorgeous.  However, I have to admit, when I first saw it, I thought the color palette of mostly cobalt blue, orange, terracotta, minty green, off-white, and black was going to be challenging to work with.  Turns out it’s fresh and unique, and a lot of fun to build around.

Back to the vase…guess what I paid for it?  Only $2.98!   So, go green: go thrifting!

Vegan Fresh Plum Tarts or Hand Pies with Basil Caramel Sauce

Yield: 4 tarts

My annual gift of fresh plums from Mike Grover via Diane O’Neal partially inspired these new treats.  Mike’s tree is prolific and, each year, he harvests more than he knows what to do with, so he generously shares.  Last year I created a favorite Vegan Thai Rice Noodle, Plum, and Shitake Salad published in my  new cookbook (see below) and Vegan Rice Cakes with Fresh Plum and Sake Maple Syrup; Mike created a beautiful-looking plum bread.

This year, with July 4 tomorrow, I created glistening red plum tarts and hand pies.  The jewel-tooned filling is encased in scrumptious dough from The Blooming Platter Cookbook.  I prepared enough dough and filling for four, so I shaped two as tarts and two as hand pies.  Though both require equal amounts of my tasty dough, I decided that I prefer the tarts because the beautiful filling shows more.  If you really want to serve hand pies, though, you could cut sluts in the top surface to reveal some of the  colorful interior.

The filling is based on a recipe in the July 2011 issue of Bon Appetit for Cherry Hand Pies.  It was the result of combining both fresh and dried cherries.  That sounded like it would deepen the flavor, yet still taste fresh.  The best of both worlds!  So, since I happened to have both fresh and dried plums, that’s what I used.

After sampling one, it seemed to need just a little something to take it over the top.  So I did what I always do: closed my eyes while taking a bite and mentally pairing the tart with other flavors until I hit on the right combination.  In this case it was caramel sauce and basil whipped cashew cream!  However, since I didn’t have any cashews and didn’t want to purchase some and then have to wait while they soaked over night, I decided to make a quick Basil Caramel Sauce.  Yowza!  Just perfect.

The sauce only takes about 5 1/2 minutes to make, and 5 minutes of that time is simmering.  Adding the basil at the end, allows it to stay fresh and green, but opens its flavor up.  It would be good with a spoon!  Note that it thickens as it cools.

Filling:

1 cup fresh chopped pitted plums (my plums were only about the size of a walnut, so I simply pitted and halved them)

1/3 cup dried chopped plums

1/2 cup natural sugar (adjust as necessary, depending on the tartness of your plums)

pinch of sea salt

1/2 teaspoon vanilla (or try a liqueur like Chambord)

2 teaspoons arrowroot powder (or cornstarch)

2 teaspoons cold water

In a quart saucepan, combine both kinds of plums, sugar and salt.  Simmer, stirring frequently, for about 5 minutes.  While mixture simmers, stir together arrowroot powder or cornstarch and water to make a slurry.  Stir vanilla into the plum mixture, followed by the slurry.  If using arrowroot powder, remove the mixture from the heat immediately after adding or it could “break.”  If using cornstarch, return the mixture to a simmer and then remove it from the heat.  Allow to cool to room temperature.  While mixture cools, make dough.

Dough (this recipe is from The Blooming Platter Cookbook, page 168):

Note: this dough is the worlds easiest and best-behaved around.  I’m just sayin’…I  thought I had added too much ice water, but I just pulsed it a couple more times, lifted out the ball, and placed it on my very lightly floured surface, turning it over once to coat both sides, and it was perfect.

3/4 cup + 2 tablespoons white whole wheat flour (or unbleached all purpose flour)

pinch of sea salt

3 tablespoons non-hydrogenated coconut oil (semi-solid at room temperature; now considered part of a healthy diet!)

Scant 1/3 cup ice water

Preheat oven to 400 degrees.  Line a baking sheet with Silpat or parchment paper, or use a seasoned baking stone, and set aside.  Combine the flour, salt, and coconut oil in a food processor, and pulse a few times until the coconut oil is evenly distributed and the dough looks like coarse sand.  Begin adding water, 1 tablespoon at a time, pulsing a few times after each, just until the dough comes together.  It should be slightly moist, but not sticky, very easy to handle, and formed into somewhat of a ball.  Lift it out of the  processor, gathering up any loose bits, and divide the dough into fourths.

On a very lightly floured surface, shape each into a small disk and then roll out, using a lightly floured rolling pin, to about 5 inches in diameter.  The dough should be quite thin, but not so much so that it will tear.  Gently lift each dough circle and place on prepared baking sheet, gently reshaping if necessary.  (I like to use the tried-and-true method of rolling the circle of dough around the pin, transferring it to the baking sheet, and then unrolling in place)

Place one-fourth of the cooled filling in the center of each circle of dough.  If making tarts, fold up about an inch border of dough around the edges, gently pleating it to form a circle, but leaving a nice circle of filling showing in the center.  If making hand pies, fold one half of the dough over the filling, matching the edges of the dough circle to create a half-circle, crimping with a fork to seal.  (You may use a tiny bit of water rubbed on the edges with your finger to help seal, but I didn’t find it necessary.)  Make a couple or three slits in the top surface if desired to allow a little of the pretty filling to show through.

Bake for approximately 15 minutes, but check periodically to avoid over-browning.  Remove the baking sheet from the oven and, as soon as the tarts/ hand pies are easy enough to handle, use a metal spatula remove them to a wire rack to cool slightly.

While they bake, make Basil Caramel Sauce.

Basil Caramel Sauce:

1/2 cup natural sugar

1/4 cup cold water

2 tablespoons vegan soy creamer

1 tablespoon fresh minced basil

Garnish: for each tart/hand pie, a dab of vegan sour cream or whipped cream and a sprig of fresh basil

In a one-quart saucepan or small cast-iron skillet, combine sugar and water.  Heat over medium-high until simmering.  It will froth up liberally. Stir frequently for about 2-2 1/2 minutes.  Add creamer and continue stirring and simmering for another 2- 2 1/2 minutes.  Remove from heat and stir in basil.  Cool a minute or so to thicken every-so-slightly and serve immediately over tarts/hand pies and garnish them as desired.  Store any leftover tarts/hand pies or sauce in an airtight container in the refrigerator.  Reheat before using.

Vegan Bombay Lentil Sloppy Joes

Yield: 4-6 servings

Here, my Sloppy Joes aren’t so sloppy.  I neatened them up a bit by serving them on a rice cracker boat lined with a fresh baby spinach leaf fora little starter or lite lunch.  But I served the mixture on whole wheat buns for my AP Students end-of-year dinner.  These more traditional “Joes,” with their nod to India, were a hit with these teenagers!

For my presentation here, I particularly like the “Sweet Chili” flavor of Quaker Oats Rice Snacks.  That is, I liked them until I discovered the monosodium glutamate in the ingredient list.  After a quick scan, I had been delighted that they didn’t contain whey or any other dairy as so many of the “ranch style” and other flavored chips/crackers do.  But, when I bought them a second time, a closer read revealed the MSG.  Darn! Alas, the “Joe” mixture is delicious on Melba Toast.

But back to the yummy filling: the lentils give it a texture somewhat similar to ground meat–so crumbled tempeh would be a fine substitute–and the flavor is rich and tomato-y like traditional Sloppy Joes, but raisins and spices give the dish warm undertones of India.

Usually when I’m creating a recipe, I am meticulous about writing down the ingredients and precise amounts.  However, in this case, I had purchased crushed tomatoes with basil because that’s all Trader Joe’s had, so the flavor was all wrong for what I sought.  I started grabbing spices and adding them by the spoonful in order to mask the Italian flavor and punch up the Indian.

The result was so good that I wish I hadn’t been so frantic.  At any rate, I remade the recipe for a report and videographer from WAVY TV yesterday when they were here to tape and the results were at least as good, if not better.  This time I got the measurements down exactly right.  Though inspired by Aarti Sequeira’s  Bombay Sloppy Joes, I not only substituted lentils, but used loads of additional spices.

2 tablespoons vegetable oil

1 medium yellow onion, cut into 1/4-inch dice

2 cloves garlic

1 red bell pepper, cut into 1/4-inch dice

1 tablespoon grated ginger

1 small mild (or spicy!) chili pepper, seeded and finely chopped

1 teaspoon ground cumin

1 teaspoon ground coriander

1 teaspoon turmeric

1/2 teaspoon ground cardamom

1/2 teaspoon paprika + 1/2 teaspoon smoked paprika (or 1 teaspoon of either one)

sea salt and coarsely ground black pepper to taste

1/2 cup water

1 cup diced tomatoes with juice

1 cup tomato sauce (I just blended some of the diced tomatoes and juice)

1 pound steamed lentils (I purchase them already steamed at Trader Joe’s)

1/4 cup shelled pistachios

1/4 cup golden raisins (or dried cranberries)

1 tablespoon pomegranate molasses or agave nectar

1/4 cup very thick coconut milk (like Chaokoh) or soy creamer

Optional (but delish): about 1/4 cup of chopped fresh cilantro

Accompaniments: 4-6 whole wheat buns, if serving as Sloppy Joes, poppadom if serving as an Indian “tostato,” or crackers/toasts if serving as an appetizer

Optional: small fresh baby spinach leaves to line the cracker before adding the Sloppy Joe mixture

In a large cast iron skillet over medium-high, heat olive oil to shimmering.  Add onions and saute about  3 minutes, stirring frequently, until soft and some color is just starting to develop.  If you want to caramelize them for deeper color, keep sauteeing for a few more minutes and stirring until a warm caramel-y brown is reached.  Add garlic and bell pepper and saute 3 minutes more or until bell pepper is softened.  Lower heat if necessary to prevent garlic from scorching.  Add ginger and chili pepper and saute another minute or so until pepper is softened.  Add cumin, coriander, turmeric, cardamom, paprika, and salt and pepper to taste.  Stir to combine well, and saute about 1 more minute for flavors to release.  Stir in water, diced tomatoes and tomato sauce.  Heat through, stirring frequently.  Stir in lentils followed by pistachios and raisins.  Simmer, stirring occasionally, for 15 minutes.  Stir in pomegranate molasses and soy creamer just until heated through.  Right before serving, stir in optional cilantro.  Serve hot over hamburger buns, spooned over a poppadom like a tostato, or in a bowl surrounded by crackers/toasts as a filling protein-rich appetizer.

Related Posts Plugin for WordPress, Blogger...