Vegan Grits and Black Bean Cakes with Salsa Verde

Yield: 8 appetizer servings of 1 small cake per person, or 4 main dish servings of 1 large or 2 small cakes per person

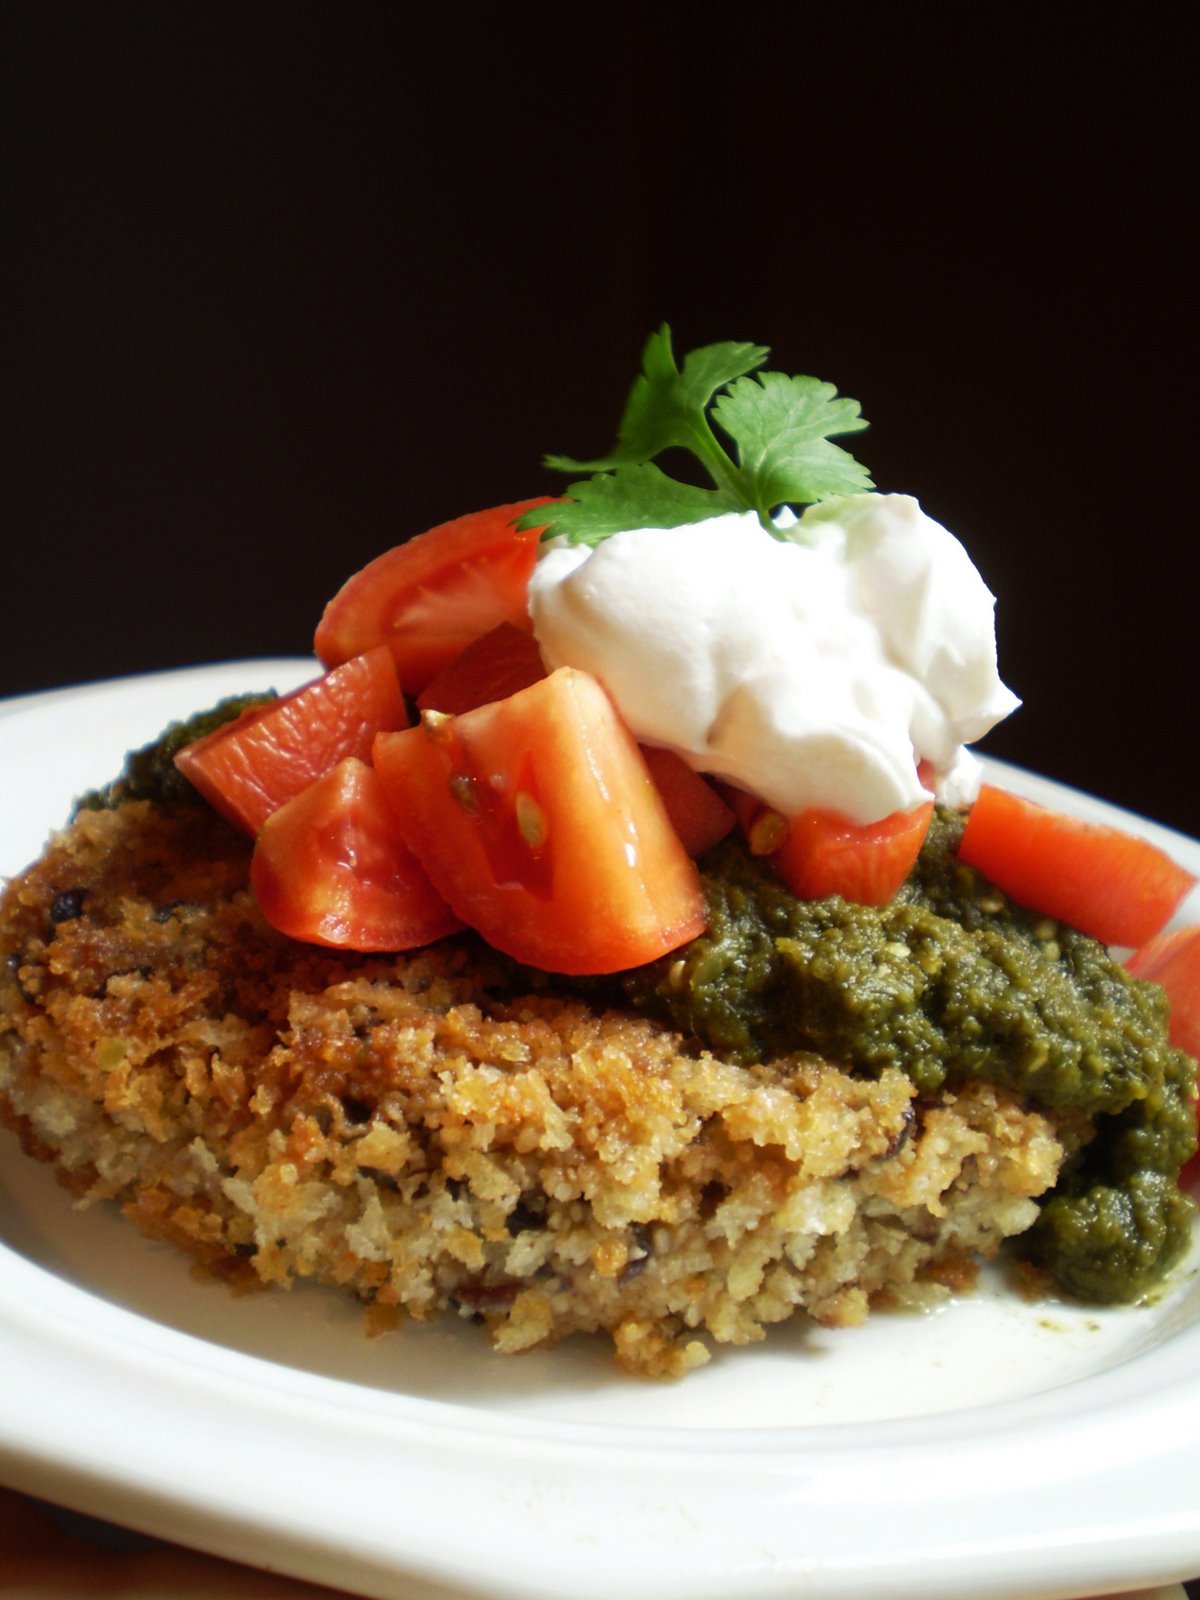
At a restaurant recently, my friend Katherine ordered grit cakes over greens. The greens were exceptional, but I had to also have a tiny taste of one of the cakes as “research.” They were very creamy–loaded with cheese–with a crispy exterior, but not particularly flavorful. Still, that did it: I had a craving for vegan grit cakes and a mission to make them tastier.

Not long after, I read a recipe for mashed plantains and, suddenly, I knew that my next experiment would be grit and black bean cakes with mashed plantains. I made a mess out of the latter, turning them into tough little pieces of leather–dog chews–because I roasted them too high and too long. I’ll post my tasty redux soon. But, in the meantime, I wanted to post the cakes, as they are sensational. Pressing panko bread crumbs directly into the cakes–how did we function previously without these crispiest of crumbs?–gives them a beautifully crunchy crust without any other binder or batter.

Grits are often served with greens, so I wanted to create a twist; hence, the green salsa. It could scarcely be fresher, healthier or more perfectly married to the cakes. Both the cakes and the sauce took quite a bit of tinkering to get the flavor and balance just right, but I loved the result and trust you will too. They’re best served immediately after making, but would probably reheat well in the oven at 350 degrees for a few minutes. Heating them in the microwave renders them a little soft, but certainly still edible.

1 tablespoon olive oil
1/2 cup peeled and diced onion (I used red onion)
2 cloves garlic, peeled and minced
pinch salt
2 1/2 cups water
1 cup quick-cooking grits
2 tablespoons nutritional yeast
1/2 teaspoon ground cumin
1/2 teaspoon sweet paprika
1/4 teaspoon ground coriander
sea salt and freshly ground pepper to taste
1 can black beans, rinsed, drained and coarsely mashed with a potato masher (not a food processor)
1 cup panko bread crumbs placed into a shallow bowl
canola oil (1/4″ deep in a large cast iron skillet)
Salsa Verde (below)
Recommended Garnishes: chopped fresh tomato, a dollop of vegan sour cream and a sprig of fresh cilantro for each serving

In a medium saucepan over medium-high, heat oil to shimmering. Add onion and garlic and saute until very soft and starting to turn golden. Add water and bring to a gentle boil. Stir in grits and next 5 ingredients and simmer, stirring very frequently, for 5-7 minutes or until water is evaporated and grits no longer taste raw. Remove from heat and spoon into a bowl. Stir in mashed beans until well incorporated. Cool to room temperature or ever-so-slightly warmer. The cakes are especially easy to handle if you make the smaller version as described below, though I made the larger ones for the photo and they handled beautifully. (Note: I haven’t tried chilling the mixture. I’m not sure if the cakes would get warm enough in the center, but try it if you like and let me know how it works.) While mixture cools make Salsa Verde (below).

When ready to saute the cakes, heat the canola oil in a large skillet over medium-high. Meanwhile, shape cakes using either one or two scant ice cream scoops of the grits and black bean mixture per cake. Shape each cake into a patty in your palm and then dredge in panko bread crumbs, carefully turning to coat both sides. Place into oil and cook 2-3 minutes per side. Remove cakes to a paper towel-lined plate or tray to absorb any excess oil. Keep warm in oven while you cook the remaining cakes. If cooking the cakes in batches, use a spatula to try to remove any bread crumbs from the oil in the skillet, as they are likely to burn if allowed to remain in the oil during the cooking of more than one batch. Serve warm with Salsa Verde and garnish as desired.

Salsa Verde:

3 large tomatillos halved, papery skin removed (slightly larger than a golf ball; if tomatillos aren’t available, use a medium green tomato)
.66 ounce package fresh cilantro, stems and all
3 ounces fresh baby spinach
Optional: a tiny bit of a hot green chili (seeds and membrane removed)
1 large shallot, peeled and halved (about the size of a golf ball)
2 large cloves garlic
1/2 teaspoon vegetable bouillon or 1/2 of one extra-large cube
1/2 teaspoon onion powder
1/2 teaspoon chili powder (Ancho is particularly good)
1 tablespoon maple syrup
1 teaspoon balsamic vinegar
1/2 teaspoon lime juice
zest of one half of a lime
sea salt and freshly ground black pepper to taste

Place all ingredients into the bowl of a food processor fitted with a metal blade and process until smooth. Taste and adjust seasoning if necessary. Heat gently in a small saucepan over medium heat or in the microwave in a microwave-safe bowl for a couple of minutes.

Vegan Spinach, Mushroom and Red Bell Pepper Tamales

Yield: 14 tamales

Everyone loves to open a package, especially an edible one. Tamales are some of the tastiest—and easiest —savory packages to prepare. If you can tie a knot, you can make a tamale.

Heretofore, daunted by what seemed like too much work with an uncertain outcome, specialty ingredients, and the astounding amount of shortening recommended for the masa dough, I was recently encouraged to give tamales a try by an article in Food Network Magazine. In it, culinary star Ingrid Hoffmann shared her recipe for shortening-free tamales in which the dough and filling ingredients are combined instead of layered with moisture provided by prepared green salsa. Rather than masa, her recipe calls for ordinary self-rising cornmeal mix and she even demonstrated how tamales can be made in tin foil if corn husks aren’t available.

Though Hoffman’s Caribbean-inspired version sounded delicious, I sought a meat-and-cheese-free version with more traditional southwestern flavors, even if the approach was not completely authentic. After one dense, dry, flavorless flop, I conducted a little more research and a little more brainstorming, ultimately creating these moist bundles, bursting with flavor, color and nutrition from lots of vegetables, including cream-style corn for extra moistness, salsa and spices. A duet of ultra-simple sauces plus a sprig of cilantro crowns the tamales in the colors of the Mexican flag.

Approximately 20 corn husks (as some may split), available at local tiendas or Hispanic markets (or 14-6×8-inch squares of foil)
2 tablespoons corn, canola or olive oil
1 cup medium-fine diced yellow onion (approximately one medium onion)
1 cup medium-fine diced red pepper (approximately one medium pepper)
2 cloves garlic
8 ounces white or portabella mushrooms, wiped clean, and chopped very fine in food processor
2 teaspoons kosher salt (or to taste)
Freshly ground black pepper to taste
2 teaspoons ground cumin
1 teaspoon ground coriander
1 teaspoon sweet paprika
½ teaspoon dried oregano
¼ teaspoon smoked paprika
6 ounces ready-to-eat baby spinach, chopped very fine in 3 batches in food processor
¼ cup finely chopped fresh cilantro
Zest of one medium-large lime (save skinless lime for white sauce)
1-14.5 ounce can cream-style corn
½ cup prepared mild green salsa (salsa verde)
Optional: 2 tablespoons nutritional yeast (imparts a subtle “cheesy” flavor and a nutritional boost; available at health food and organic food stores; if omitted, you may need to add 2 additional
tablespoons cornmeal mix)
1/1/3 cup yellow self-rising cornmeal mix

Fill a large mixing bowl with hot water and separate husks into bowl, submerging them with a plate. Allow to soften for 30-45 minutes. Meanwhile, heat oil in a large cast iron skillet over medium-high. Add onion and bell pepper, and sauté, stirring frequently, until onion is softened and starting to turn golden. Add garlic, mushrooms, salt, pepper and spices, and sauté, stirring frequently, for a few minutes or until garlic and mushrooms are softened and starting to break down. Remove from heat and stir in remaining ingredients, except cornmeal mix. Taste and adjust seasoning if necessary. Then stir in cornmeal mix until well-combined. (The latter is not very tasty raw.) The consistency should be similar to a juicy brownie batter. Tear 3-4 of the corn husks into 1/4-inch wide strips and double-knot two strips together, overlapping ends by about 1 ½ inches. Set aside. Working with one corn husk at a time, remove it from the water onto a kitchen towel, wide end up. Spoon approximately 3 tablespoons of filling (4 for really large husks) into a 1½ x 4” long log-shape in the center of the husk, starting about ¼-inch from top edge and stopping about 2/3 of the way down. Fold one side of husk snugly over filling, and repeat with the other side. Hold husk in place while you fold the bottom third up. Still holding husk to prevent it opening, slip a knotted strip under the tamale, bring ends of strip up and over the front of the tamale and double-knot to hold folded end in place. Set aside, slightly propped up if necessary to prevent filling from spilling out. (Use the same procedure if using foil, but skip the tying step.) Repeat with remaining husks and filling. When about halfway through, fit a deep pot with a steamer, run water just to the underside of the steamer, cover tightly, and place over medium-high heat. When all tamales have been tied, remove pot lid carefully to allow steam to escape and place tamales into steamer as vertically as possible, leaning them against the sides of the pot and each other. Reduce heat to medium, replace lid and steam for 30-45 minutes or until just firm. Remove lid and use tongs to carefully remove tamales to a platter or plates. Allow to rest for 5 minutes before serving warm with sauces and fresh cilantro. Diners should remove ties, open husks, top as desired, and eat tamales while resting on husks, but they should not eat the husks themselves.

Red Sauce

½ cup prepared mild green salsa
2 Roma tomatoes, rinsed, dried and quartered
Kosher salt and freshly ground black pepper to taste

Process together in the bowl of a food processor until chunky-smooth. Pour into a small dish and pass for spooning over opened tamales. You may heat sauce if desired.

White Sauce
½ cup vegan sour cream (dairy sour cream may be substituted)
Juice of one medium-large lime
Kosher salt and freshly ground black pepper to taste

In a small bowl, whisk together until well combined. Pass for dolloping on top of Red Sauce.

Garnish: whole or chopped fresh cilantro sprigs

Vegan Gingerbread Pancakes with Orange Sauce

Yield: 8 pancakes

These pancakes are not for sissies! I love gingerbread, but it may be an acquired taste for some. Like their namesake, these pancakes have a very deep flavor that is offset beautifully by the orange sauce. And they look so pretty and summery with a little sprig of mint. Some orange zest and/or a slice of orange would also look nice on top in warm or cold weather months.

The inspiration for the spice blend–the dry mustard is not an error!–comes from Sally Schneider’s gingerbread recipe as adapted by Lynn Rosetto Casper of The Splendid Table. For the sweetener, you’ll notice that I used three different types–four if you count the one in the sauce–because each contributes different characteristics to the final product. But if you just have one or two of them on hand, use what you have. I felt more sweetener than I usually use was needed to mellow the other bold flavors, but it makes the batter more susceptible to burning, so cook these at a slightly lower temperature than normal.

Despite their assertiveness–or maybe because of it–these pancakes are delectable.

1 cup unsweetened soy milk minus 1 tablespoon (plain or vanilla soy milk would be good too)
1 tablespoon apple cider vinegar
1 tablespoon + 1 teaspoon instant coffee (I use decaf)
1 tablespoon mild molasses (not blackstrap)
1 tablespoon brown rice syrup
1 tablespoon brown sugar (or raw sugar)
1/2 teaspoon vanilla
2 tablespoons fresh ginger
zest of 1/2 of a lemon or small orange (don’t omit; I think it is needed for balance)
2 scant tablespoons vegan butter (I like Earth Balance)
1/2 cup whole wheat flour
1/2 cup self-rising flour
1/2 teaspoon baking powder
1/4 teaspoon baking soda
1/2 teaspoon ground ginger
1/4 teaspoon ground cinnamon
1/4 teaspoon dry mustard
1/8 teaspoon or a pinch of ground cardamom

In a small cup or bowl, whisk together soy milk and vinegar to make vegan buttermilk. It will curdle in just a couple of minutes. When it does, whisk in next six ingredients, ending with the fresh lemon or orange zest, until coffee is dissolved. In a large cast iron skillet over just slightly higher than medium heat, melt 1 scant tablespoon of the butter. Meanwhile, in a medium bowl, stir together both flours and remaining pancake ingredients. Make a well in the center and add the soy milk mixture. Stir just until combined and few lumps remain. This batter spreads a little more than most of my others, so I would cook only two pancakes at a time using a 1/4 cup measure. Cook fairly slowly for a few minutes on the first side. Also unlike some of my other pancakes, bubbles will appear in this one indicating doneness. When done, gently flip and cook another few minutes on the reverse. Add butter to keep skillet greased as needed. When cooked through, remove pancakes to plates or a serving platter, keep warm, and repeat with remaining scant tablespoon of butter and pancake batter. While pancakes cook, make Orange Sauce (below). Serve pancakes with generous spoonfuls of the sauce and garnish with a sprig of mint and/or a slice of fresh orange or a sprinkling of orange zest.

Orange Sauce:

1 cup orange juice
1 tablespoon arrowroot powder
1 tablespoon maple syrup
zest of 1/2 half of a lemon or small orange

Garnish: a sprig of mint and/or a slice of orange or fresh orange zest per serving

In a very small bowl or cup, whisk 2 tablespoons of orange juice with 1 tablespoon of arrowroot powder until fully incorporated. In a small saucepan over medium high heat, bring remaining orange juice to a gentle boil. Remove from heat and whisk in arrowroot mixture. It will thicken almost immediately. Then whisk in maple syrup and zest. Serve immediately. Reheating is not recommended as arrowroot could “break,” causing the sauce to become too thin.

Vegan Eagle Brand Seven-Layer Magic Cookie Bars

Yield: 24-36 squares

I sometimes crave this childhood favorite made from layers of graham cracker crumbs, pecans, chocolate chips and coconut. (The Eagle Brand original contains butterscotch morsels, but I didn’t have any vegan ones, so I just used chocolate chips making my bars six layers. If you live where there are Price Chopper grocery stores–I don’t–they are supposed to carry vegan butterscotch chips. I’ve even heard Food Lion mentioned–which we do have–but I haven’t checked it out.)

The only trouble is that the “glue” that holds the whole thing together is condensed milk. I’ve researched vegan substitutions, but none appeal. I’m not sure why it hit me, but I had almost a whole can of Cream of Coconut left over after using a tiny amount in another recipe and I wondered if it could be substituted for the condensed milk in this recipe since coconut is part of the flavor profile. Plus the consistency and sweetness are very similar, at least as I recall. So, I made the original recipe, substituting the Cream of Coconut, and I’m pleased to share the habit-forming results here. For better or worse (if you lack self-control!), this old standby is now certified vegan. If this is old news to you vegans out there, my apologies, as it was a break-through for me!

One note of caution about graham crackers: Honey Grahams, as the name implies, contain honey. But I was surprised to learn that the cheaper “store” brands of even the regular graham crackers contain dairy such as buttermilk. The plain name-brand graham crackers, though, are vegan.

1/2 cup vegan butter (I like Earth Balance)
1 1/2 cup vegan graham cracker crumbs
1 cup pecan pieces or coarsely chopped pecans
1 cup vegan chocolate chips
1-3.5 ounce can shredded coconut
1 1/4 cups Cream of Coconut (about 14 ounces)

Preheat oven to 350 degrees. Place butter into a 9 x 13 inch pan and slide into the oven for a few minutes during the preheat to melt. Remove from oven and sprinkle crumbs over the butter in an even layer. Do the same with the pecans, followed by the chips and then the coconut. Pour the Cream of Coconut over the entire concoction; there should be enough to completely cover. Bake for 25 minutes and cool in pan for at least 15 minutes before cutting. Store any leftovers tightly covered.

BD’s Grilled Summer Squash with Chutney

Yield: 4 servings

You know how sometimes the most memorable meals are the simplest? Well, that was decidedly the case last summer when I visited with friends Iona Drozda and Brenda Davidson aka “BD” at their respite of a home known as Wren House. (You’d never know you were in the ‘burbs.)

Despite a warm summer drizzle, we sat out next to the wood burning stove near the lake while BD perfectly grilled ciabatta bread which we ate on the porch overlooking their “relaxed” formal garden. She served it with a refreshing and slightly “zingy” veggie salad.

This summer, they sent me the accompanying photo as a teaser which I asked if I could post. Iona, a wonderful artist, was embarrassed that she hadn’t “styled” the photo, but I thought it was “stylish” in its simplicity. Check out those “unretouched” grill marks! So I requested instructions for these “beauties” as Iona referred to them, which BD was happy to supply below. Their squash came straight out of the aforementioned garden, so if you don’t “grow your own,” try to visit your local farmer’s market, though a grocery store will do.

For this recipe and some 170+ more,

I invite you to purchase my first cookbook:

The Blooming Platter:

A Harvest of Seasonal Vegan Recipes

Vegan Heritage Press

Spring 2011

Photo Credit: Iona Drozda

Vegan Banana-Blueberry Sour Cream Coffee Cake with Streusel Topping

Yield: 1-9×13″ coffee cake or approximately 12 pieces

Our friends Jeff and Debbie invited us and a few other adults and kids up to their beautiful farm on the Eastern Shore of Virginia on July 5 to pick blueberries and raspberries. A steady rain didn’t deter the most intrepid among us, but I didn’t pick quite as many berries as I did last year. Still, I had enough to make this moist coffee cake that I created with last year’s haul, inspired by, of all people, the prince of pork fat, Emeril Legasse. Never fear, my recipe contains nothing that came from a pig nor any other four-leggeds.


For this recipe and some 170+ more,
I invite you to purchase my first cookbook:

The Blooming Platter:
A Harvest of Seasonal Vegan Recipes

Vegan Heritage Press
Spring 2011

Vegan Spiced Nuts

Yield: 1 pound nuts

I first tasted these nuts at a party at our gym. Marla, one of the employees, brought them to our holiday potluck and they were a huge hit. The original recipe, made with rosemary, came from Ina Garten, The Barefoot Contessa.

However, a happy accident led Marla to an adaptation of the recipe which, in turn, led to mine. Marla was transporting the nuts in a cooler to her family’s house, several states away, at the holidays. She arrived to find to her horror that water had sloshed into the container of nuts. Undeterred, she put them in the oven to dry them out and she liked the result so much that, now, when she makes a batch, she spritzes them with water during the roasting process.

Too lazy to spritz, I decided to add a little water at the beginning, as my only criticism of the original recipe was that the brown sugar never fully dissolved and didn’t adhere to the nuts quite as much as I would have liked. It works beautifully and, as Marla first discovered, results in an ever-so-lightly “candied” nut. (Don’t think cloying, overly sweet, too heavily coated, as they definitely are NOT.) When you remove the nuts from the oven, they may appear a little sticky or gummy. But, never fear. As they cool, they crisp right up and you can just gently break up the clusters–or leave them “right like they are” (as my friend Tammy would say)–as you transfer them into a container.

I bought a three pound can of cashews and a three pound sack of walnut halves at a wholesale club recently and experimented quite a bit. For the most part, Ina had it right: the cashews seem to make a better product than the walnuts, and fresh herbs like basil and tarragon mostly lose their flavor in the roasting process. However, I had also wondered about using dried ground spices in place of the fresh herbs and discovered, to my delight, that curry powder is the ticket. (The nuts in the photo are the curry variety.) Both flavors make terrific holiday or host(ess) gifts.

One final note: if you make several batches in succession, I would advise changing pans, as the little bits on the bottom become too dark with repeated roastings resulting in a burned-tasting product. I had to feed my last batch of walnuts the birds.

1 tablespoon vegan butter (I like Earth Balance)
2 tablespoons brown sugar
2 tablespoons water
the leaves from approximately 5 stalks of rosemary, minced
OR 2-3 teaspoons ground curry powder (or the dried ground spice of your choice)
1 teaspoon kosher salt
pinch cayenne pepper
1 pound cashews or cashew halves and pieces

Preheat oven to 400 degrees. Place all ingredients except the cashews in a 9 x 13″ metal pan, choosing either the rosemary or the curry powder. Place the pan in the oven just until the butter melts. When melted, carefully remove the pan from the oven and add nuts, stirring to coat evenly. Roast for 8-10 minutes, stirring twice during that time. Remove from oven and spoon onto a baking sheet into a thin layer to cool. When nuts are room temperature, gently break them apart as you place them into an airtight container.

Vegan Quinoa, Corn, Peach and Boiled Peanut Salad with Sweet Tea Dressing

Yield: 4-6 servings

Salads don’t get any more southern or more tasty than this one, not to mention beautiful and nutritious. Do yourself a favor and the salad justice by using only farm-fresh produce because the taste of the salad is largely dependent on that of the corn and peaches. If boiled peanuts sound odd in a salad, you’ll be so surprised. Their mouth feel is similar to beans, but their flavor is distinctive and delicious. I purchased mine at a farmer’s market, but they are sold in cans in the veggie sections of grocery stores. For a formal ‘south’ren touch, serve the salad in teacups like the one in the photo which I inherited from my late Nana. A sprig of mint or parsley completes the pretty picture.


For this recipe and some 170+ more,

I invite you to purchase my first cookbook:

The Blooming Platter:

A Harvest of Seasonal Vegan Recipes

Vegan Heritage Press

Spring 2011

Vegan Caramelized Banana-Macadamia Nut-Coconut Milk Ice Cream

Yield: 1 quart

Wheeler del Torro’s The Vegan Scoop rules! His basic formula combined with my friend Shelley’s recommendation for banana-nut ice cream and my penchant for anything caramelized led to this concoction. As a child, I was “mad” for Brennan’s Restaurant’s Banana’s Foster on pre-vegan trips to New Orleans: bananas caramelized and flamed tableside and served over rich vanilla ice cream. Out of the fire and into the freezer comes this vegan-approved almost guilt-free pleasure with a bow to Sin City.

1-14.5 ounce can coconut milk, with 1/4 cup poured into a small cup or bowl
2 tablespoons arrowroot powder
2 tablespoons vegan butter (I like Earth Balance)
3/4 brown sugar
2-3 bananas, sliced about 3/4-1″ thick
1 1/4 cups plain soy creamer
1 cinnamon stick
1 tablespoon vanilla extract
1/2 cup coarsely chopped toasted macadamia nuts (if macdamia nuts would break the bank, your favorite nut will do nicely)

In a small bowl, whisk together the 1/4 cup coconut milk and arrowroot powder until smooth. Set aside. In a large skillet over medium-high heat, melt butter. Stir in brown sugar and cook until dissolved. Lower heat just slightly if mixture is cooking too fast. Add banana slices and cook, stirring fairly frequently, for about 3-5 minutes or until bananas soften and begin to caramelize. remove from heat and mash right in the skillet with a potato masher. (If you use a non-stick skillet, remove bananas before mashing, or you will scratch the surface.) Place the remaining coconut milk, soy creamer, cinnamon stick and mashed bananas into a medium saucepan and bring just to a boil over medium-high, stirring occasionally. Remove from heat and quickly whisk in coconut milk-arrowroot mixture until very smooth followed by the vanilla extract. Allow to cool to room temperature, whisk again if lumps remain, and then cover and refrigerate several hours or overnight until thoroughly chilled. Whisk to remove any remaining lumps and then freeze according to your ice cream maker’s instructions. (I use a Cusinart electric ice cream maker.) When ice cream is almost frozen, pour in chopped nuts and continue freezing so that they are well distributed. Scrape ice cream into an airtight container and store in freezer.

Vegan Fancy Franks–Perfect for the Fourth of July

Yield: 8 hot dogs

You’ll love my “twist” on the traditional hot dog just in time for Independence Day in the U.S. Think “Pigs in a Blanket” kicked up a notch with the help of puff pastry dough. Once baked, they look really cute served upright in a wine glass, but they didn’t photograph too well like that. Regardless of how you serve them, guests of all ages will salute you. For adults only, I recommend accompanying them with Margarita Mayo and Pina Colada Catsup. It’s true that mayonnaise isn’t a traditional condiment for dogz, but something about the buttery “bun” contrasting with the tart lime makes for a delicious combination in this case. I also tried a Mojito Mustard, but lime, never mind mint, isn’t too tasty with mustard. A Mango Mustard, however, sounds marvelous. If you experiment with sauces, please share your results. Happy Fourth of July!

8 vegan hot dogs
1 sheet Pepperidge Farm puff pastry, thawed according to package directions

Preheat oven to 400 degrees. Line a baking sheet with a Silpat sheet or apply nonstick spray sparingly. Slice puff pastry into 8 equal strips. Working with one dog at a time, wind and spiral the dough down the length of the frank making sure to gently press the ends of the strip of dough against the underside of the dog at both ends. You may need to slice about an inch off of each piece of dough, depending on the size of your hot dogs. Place the dog on the baking sheet and repeat with remaining franks and dough, leaving a couple of inches between each one. Bake for approximately 22 minutes or until golden, but start checking after about 15. Serve warm or at room temperature with the condiments of your choice. I particularly like the following:

Pina Colada Catsup

1/4 cup catsup
2 teaspoons Cream of Coconut
2 teaspoons pineapple juice
2 teaspoons rum (I used a golden variety)

Whisk all ingredients together and serve or store in an airtight container in the refrigerator.

Margarita Mayo

1/4 cup vegan mayonnaise
2 teaspoon fresh lime juice
2 teaspoons tequila
2 teaspoons VERY loosely packed lime zest (approximately the zest of one small lime)
pinch salt

Whisk all ingredients together and serve or store in an airtight container in the refrigerator.
Note: for a pretty and authentic Margarita presentation, you can dip the rim of a small glass or glass bowl in fresh lime juice and then in salt before filling with the mayo.

Related Posts Plugin for WordPress, Blogger...
Site developed by IYPS

Featuring Recent Posts WordPress Widget development by YD